

For the early sections in the Lanayru Desert, it’s a bit of a breeze, but as soon as you get to the section where you need to turn and activate the power generator, things get interesting. While the obvious answer is just to use the search ability, and complete each of the three sections, you might find yourself back at the generator afterwards with no idea how to turn and set the three dials to complete it.
Fortunately, we’ve got your back and you can find out exactly what you need to do in the section below to get your through to the temple. However, if you’re having trouble with either of the three sections themselves, you can read on further to find out how to get through each of them and the best way to avoid getting wiped out on a regular basis.
AdvertisementIf you want to see more of the introduction to the game, you can watch this The Legend of Zelda Skyward Sword Switch guide to pick things up from the very beginning.
How to turn and activate the Lanayru Desert power generator after completing the three section
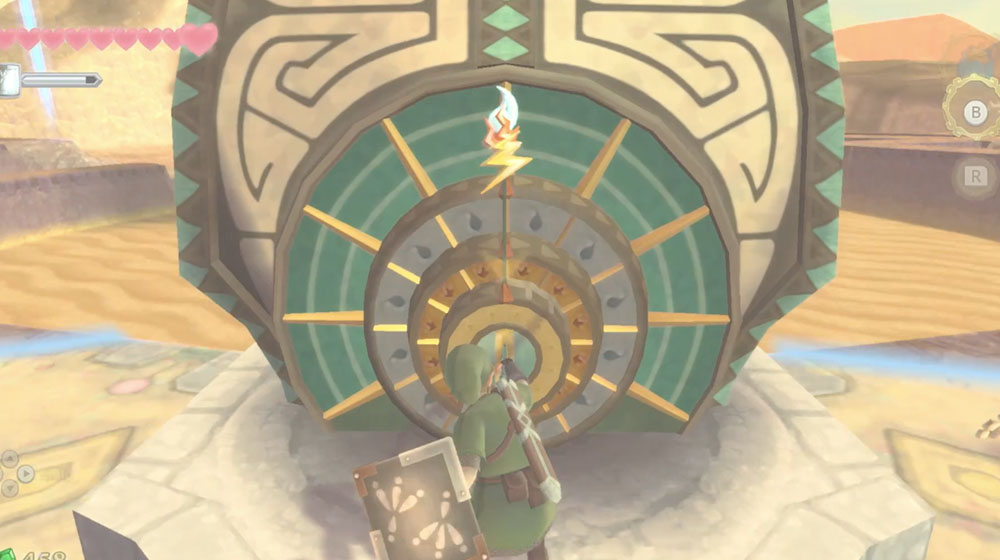
We’ve put this at the top, because it’s probably the place where most of you will get stuck. The game doesn’t really explain how you should turn the dial and set the three hands to activate the power generator. If you just put them in the same position you had them in for the individual switches in the rooms then you’re just not going to power up anything.
Instead, what you need to do is start with the first dial and turn it to the 9 position. If you’re not too sure how to get your sword in to start with, just jab forward if you’re playing with motion controls with Joy-Cons or click down on the right stick if you’re playing button controls. Link will then jab his sword forward into the slot and then you can use the right button to turn the dials left and right.
AdvertisementWith the first dial pointing to where the number 9 is on a clock, you can then lock it in place by jabbing forward one again. You then need to repeat the same process with the second dial to the number 4 position and the third and final dial to the number 12 position. Once all of these are in place, the power generator will light up and activate the process for the temple to rise up out of the sand.
RELATED:
The Legend of Zelda Tears of the Kingdom bosses
You can follow us on Twitter to see more on the latest video games releases, and you can see more on The Legend of Zelda Skyward Sword HD with the official Nintendo Twitter page at https://twitter.com/NintendoAmerica.
How to activate the three power generator switches
Going back to the steps before this, you can follow along with the video to see more details on how to activate the three power generator switches to trigger the dial turning section. The first one is simple and you get to it by following the hidden wall under the desert. You can see the location by using the dowse function and target the two doorways in the wall as you turn around to face west.
AdvertisementUse a bomb to open the third doorway, activate the crystal and then head in to the switch. Jab forward to insert your sword like a key and turn it to the left. Jab again to push it in and that will give you the flame dial. Next, aim your dowse function to the west to find the second switch area and set down markers to follow the walls over to it, but be prepared for the toughest of the three.
When you get into the building to the east, blow up the rubble to reveal the crystal and activate it with the beetle function. Kill all of the electricity Bokoblins with stealth attacks (see video walkthrough for a demo) and then you can make your way to the end. You’ll then need to climb onto the final block at the end, trigger the crystal back again, kill a sand snail with a bomb and ride it’s shell over to the very back.
Climb back around and push the block down to give you a way to get back up with the electricity ball. Trigger the crystal again with the beetle and then position the block you just push down so that it’s one push away from the taller block above. You should then be able to throw the electricity ball up and over, but it’s tricky, so watch the walkthrough video if you get stuck in the second power generator switch room.
RELATED:
The Legend of Zelda Tears of the Kingdom shrines
Once on the other side, throw it to the block with the hole at the bottom and then jab it with your sword when it isn’t electrified to get it in to the power unit. You’ll then be able to go into the next room and repeat the steps above to turn on the power unit.
The last of the power switches can be found in the north of the map with the dowse function and you’ll need to use bombs on the crack in the wall to get in. After that, it’s a similar process to the previous power unit of taking out the enemies, activating the crystal and getting the electricity ball creature into the hole at the end. Once you complete this, you can head back up to the power generator in the middle of Lanayru Desert and complete the dial section above.
You can also check out our computer games section, or visit The Legend of Zelda website at https://www.zelda.com/.
